The use of interactive digital smart boards in classrooms and workplaces is rapidly increasing due to their effectiveness in enhancing learning and collaboration. However, many users encounter the issue of the smart board not showing the computer screen. This problem can have several causes, but it is important to identify and troubleshoot them efficiently to prevent disruption of learning and productivity.
Why smart board not show the computer screen? or how to show computer screen on smart board?
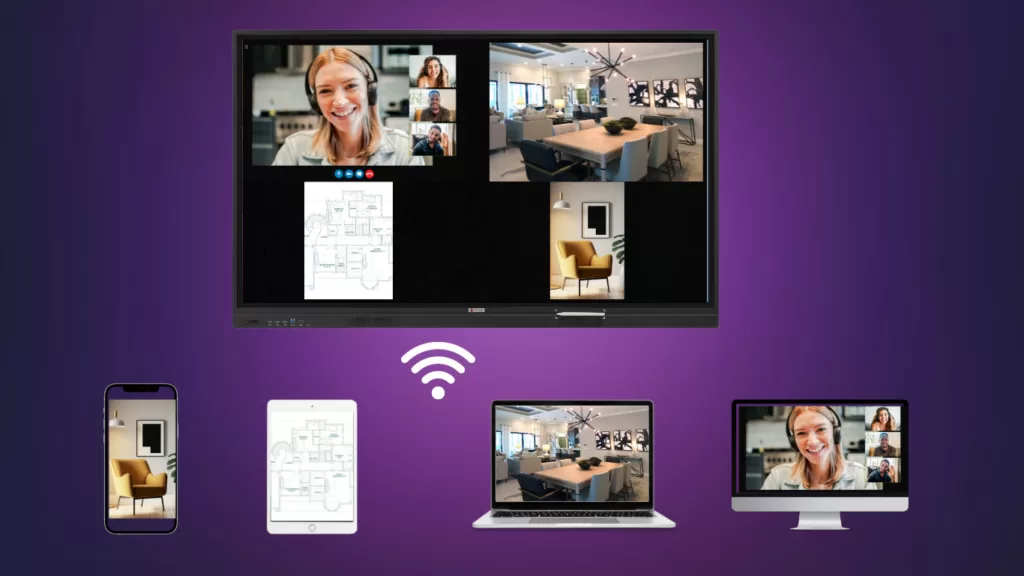
One common cause of the smart board not showing the computer screen is improper connectivity between the smart board and the computer. If you are mirroring your computer or laptop screen to the smart board, you should ensure that both devices are connected to the same WIFI and that the digital board hot-spot is turned on. Additionally, if you are using a dongle to share your computer screen to the smart board, make sure the dongle is properly paired with the computer.
Another reason why the smart board may not show the computer screen is due to a loose connectivity issue when an OPS slot-in computer is inserted into the interactive smart board. In such a case, it is necessary to verify that the OPS computer is securely connected to the smart board.
Lastly, using an HDMI cable to connect the computer to the smart board can lead to the smart board not displaying the computer screen. In this situation, it is important to examine the HDMI cable and ensure that it is properly connected to the HDMI port.
Following are detailed troubleshooting steps and solutions.
How to fix it when mirroring a laptop screen to an interactive smart board, but the smart board does not show a computer screen?
When attempting to mirror the screen of a laptop onto an interactive smart board, it is possible to encounter problems where the smart board does not display the computer screen. If you find yourself in this situation, there are several steps that you can take to troubleshoot and fix the issue at hand.
First, it is essential to check whether the Smartboard WIFI and Hotspot are turned on. The smart boards have a built-in 5G WIFI module and hot spot module and require a WIFI connection for successful screen mirroring. Verify that the smart board is connected to a WIFI network and that its hotspot is turned on. Also make sure that Hotspot and WIFI should all turn on. If the hot spot is not on, it will affect the laptop screen mirroring.
Next, it is recommended that you connect your laptop to the same WIFI network as the smart board. This is necessary to ensure that your laptop and smart board are communicating with each other over the same network. If you are unsure how to connect to a specific WIFI network, consult your laptop’s user manual or seek assistance from IT support staff.
Once your laptop is connected to the WIFI network, open the Miracast software on your laptop and click on the option to project the screen onto the smart board. This should initiate the mirroring process, and you should see your laptop’s screen displayed on the smart board.
If the above steps do not work, it is also possible that the Wireless Screen Mirroring Software may need to be updated to the latest version. This is especially true if you are using an older version of the software or if it has not been updated in some time. Check to see if there are updates available for the software and download and install them as needed.
Another mirroring situation that can not show laptop computer screen on smart board is happened when using a dongle to project a computer screen.
The method to solve the problem is also similar. First, ensure that both the WIFI and hotspot of the smartboard are turned on. Secondly, plug the dongle into the smartboard panel’s USB port and wait patiently for the dongle to pair with the smartboard. This process may take several minutes, so it’s important not to disconnect or tamper with the dongle during this stage. Thirdly, wait until the lights on the dongle have stopped flashing, then carefully remove it from the smartboard’s USB port and insert it into the USB port of the laptop or PC that requires mirroring. Fourthly, allow the dongle and computer to pair and establish a stable connection. In some cases, the dongle may require an additional driver to be installed before it can operate correctly, so be sure to check any accompanying software and drivers before attempting to connect. Finally, once the dongle has successfully paired with the computer system, press the dongle middle for screen sharing. With this function activated, the computer’s screen will be correctly mirrored on the smartboard.
Overall, these steps should be relatively straightforward and should help you troubleshoot and solve any problems you might encounter when mirroring your laptop screen onto an interactive smart board. By carefully following these steps and ensuring that all necessary settings are configured correctly, you should be able to enjoy a seamless and error-free mirroring experience.
How to fix it if digital smart boards not show computer screen happens when users have already inserted an OPS slot-in computer into the digital smart board?
When users encounter the issue of the smartboard not showing the computer screen, it usually stems from a connectivity issue between the OPS computer and the smartboard. The OPS slot-in computer is specially designed to connect with the smartboard via an OPS slot. When the OPS computer is connected to the smartboard, users can choose to display computer screen( Windows system) and the computer screen is displayed on the smartboard. However, if the smartboard does not show the computer screen or indicates a “no signal” message, users should confirm whether the connectivity has been lost between the OPS computer and the smartboard.
One of the first steps to take is to ensure that the OPS computer is connected tightly to the OPS slot. Any loose connections between the two devices will result in a failure to display the computer screen on the smartboard. After verifying the connection, users should power up the OPS computer and select the OPS signal channel on the smartboard to see if the screen is displayed correctly. If everything is connected correctly, but the screen still fails to display properly, it might be necessary to replace the OPS computer with another one.
To conclude, having a digital whiteboard and connecting it to an OPS computer is a significant step forward in modern education and business. However, encountering issues with the smartboard not displaying the computer screen can be frustrating. By thoroughly checking the connectivity and following the above instructions, users can avoid any interruptions in their learning or teaching experience.
In certain situations, users may encounter issues where the smart board is unable to display the computer screen while attempting to connect via an HDMI cable. In such cases, it is essential to carefully examine the HDMI cable and the HDMI port to ensure that they are both functioning properly. A faulty HDMI cable or port can cause a range of frustrating issues, including an erratic or non-existent signal.
There could be several potential causes for the smart board’s inability to display the computer screen via HDMI. In some cases, the issue can be easily resolved by checking the connection points for loose fittings or attempting to clean any debris or dust buildup in the HDMI port. It is also worth ensuring that the smart board display channel set at HDMI input.